Navigation Tips

Free Patterns can be seen along the sidebar (on right side),
or you can use the Free Patterns label to view all posts.

Free Pseudo-Patterns or Pattern Outlines can be found using the Free Pseudo-Patterns label.

The most comprehensive listing of Patterns, Pseudo-Patterns, and Pattern Outlines can be found on the Pattern Bibliography page.

Please read the Blog Housekeeping section in the sidebar for more info.

Friday, January 30, 2009

mordues de mitaines kal

.


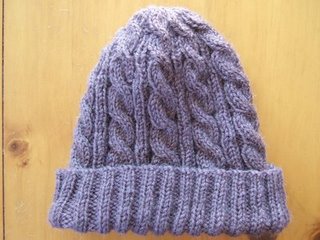
Pattern: St. Albans Valentine Cable Mitts (scroll down for download)
Yarn: Elann Baby Cashmere, mulled grape
Needles: 2.75 mm

I feel like I'm going to burst. I've been wanting to show you these since last November!!! But I had to keep it under wraps until Feb 1st for the Fingerless Gloves Fanatics Designer Feb 2009 KAL. Well now that the time has come, I can show you what these look like!!! Yay! These mitts were designed to match the St. Albans Valentine Cable Scarf.

(Yes, I know, it is not Feb 1st yet, not even in GMT ... however we've got James' blessing to post early)


The purple one is mine. Susan made the red one, visit her at her blog here.


Note: Chart last updated 6 March 2009 to correct typos in definitions for BC & FC.

Hope y'all enjoy knitting this mitt.

If you're wondering why all my photos look a bit "lumpy" around the left wrist, you can ready about it here.

Copyright © Smariek Knits 2005-2009. All full copyright rights are reserved by Smariek Knits.
.


.


.

swimming against current

.
Related posts:
28Mar2009 post (shoe shot, 1 photo).
07Feb2009 post (finished pair, 11 photos).
19Jan2009 post (beginnings, 11 photos).

Practice Pair of Socks #1, Sock #1


.
It must look like I am making "backwards" progress in the needle usage department. I've received a lot of comments and suggestions about using 2 circular needles or 1 circular needle (magic loop) to knit socks, instead of using DPNs. I know these are popular methods for knitting in the round.

The funny thing is that I had started out all my in-the-round knitting using circular needles. I learned how to knit hats in the round using circs. I had knitted fingerless mitts (Persephone Mitts and Regina Mitts) using sock weight yarn and 2.75 mm circular needles -- hey, that's practically half a sock! :-) Everything was fine, but most of my circs are 30" or longer and I found that the long dangling cords would drive me nuts. (And definitely looks weird, which is why this happened at Starbucks) Anyhow, this is why I eventually picked up some short pointy sticks to try out.

I'm hoping to perfect the use of my new pointy sticks and then move on to magic looping. I'm still searching for the missing DPN and I can't believe that I only had the DPN set for 4 days before I lost one. I'm thinking I need a BIG tomato needle cushion for me to stick my idle DPNs into so they don't get sucked into a black hole.


My first sock knitting experience is moving right along. I've managed to finish the foot and toe decrease. This portion was a cinch. Meezermeowmy had pointed out something that would prevent laddering. The thing is that it was exactly what I was doing, EXCEPT that I would shift the back (left) end of the left needle OVER the next needle while I was knitting from it, and then return it to the UNDER position after I was done. Other than this, all my other needles were in the correct Escher-like position -- left tip UNDER, right tip OVER. I don't know why I started to shift the left tip of my left needle OVER when I worked with it, I guess I found it more comfortable to knit that way. Well, I've stopped this extraneous needle shift and my laddering is much reduced. Cool. Thanks Barbara!


I tried on the sock to see how it fit. The foot seems long enough. The sock is on the loose side overall. It is neither hugging snug nor slouchy loose, though I imagine the cuff won't stay up for long. I am not very good with that gauge thing. Was I supposed to swatch? Perhaps I need to knit tighter. I'll try that on this sock's mate. I was a little sloppy in that gusset. There is a gaping hole! I'll try to do a better job on the 2nd sock.


Do you know how difficult it is to try to take a photo of one's own foot?

Copyright © Smariek Knits 2005-2009. All full copyright rights are reserved by Smariek Knits.

Thursday, January 29, 2009

mitaines roses

.


Related posts:
22Mar2009 post (2 Photos - finished mitts)

Pattern: Blueberry Tea Mitts (Ravelry Link)
Yarn: Elann Baby Cashmere
Needles: 3.0 mm

These are the mitts I test knit for Paula, using fingerling weight yarn and 3.0 mm pointy sticks. I was off to a slow start with these since I thought I'd try ML and I also CO too many sts to fit my petite hands. That didn't work out so I eventually reverted back to my pointy sticks. What I ended up doing to make these fit me is to CO 52 sts for the ribbing, increase 3 sts for the pattern, then decrease by 3 for the ribbing. I could have CO 56 for ribbing, decrease 1 for pattern, then increase 1 for ribbing, however I decided a snugger fit for the ribbing section would be better for my hands. In the end they are a perfect fit for my small hands.


I don't know what these mitts will be called. The name Paula had originally chosen is already taken, so she is going to rename them to something else soon. You'll find her blog here.
.
0.183
Copyright © Smariek Knits 2005-2009. All full copyright rights are reserved by Smariek Knits.

Tuesday, January 27, 2009

HUGe - Part 2

.
This is Part 2 in a series on the 2008 HUGe swap.
Click here for Part 1.
Click here for Part 3.
Related post: 08Jan2009 post - 21 Photos - Elann HUGe 2008 Swap, Group 1 box


Bangles #1, #2, #3, and #4


Bangle #4:

Bangle #4

I decided to use the same pattern as Bangle #3 for Bangle #4. The only difference is the yarn and color. I used Elann Highland Wool in Ruby red color. Despite being the same pattern, I think Bangle #3 in the Elann Luxury Merino Superwash came out better. I think the stitch pattern stands out better in the blue color.

Well, I thought I'd insert a photo of a the ball of yarn here. Unfortunately I can't seem to find my photo. Boo.


Red bangle

Bangle #4 is made with a red bangle, like the one above.


My personal notes on how I made this bangle:

Elann Highland Wool, Ruby
4.0 mm (US6)
Red bangle.
Circumference = ~11.25 inches (29 cm)
Width (all around) = 3 inches (7.5 cm)

Cast on 52 stitches, join in round.
Round 1 & 2: Knit
Round 3 & 4: * K2, P2 *
Repeat rounds 1 to 4 for 22 rounds have been completed.

-----------<>----------

Bangle #5:


Bangle #5

I wasn't sure I wanted to try another cable stitch after making Bangle #2 (the purple one) because I wasn't 100% happy with how that one turned out. I think it had something to do with the "non-standard" cable pattern and how the cable pattern stretched out when it was attached to the bangle. Then in June, I showed Theresa the first four bangles and she told me she preferred the cable and seed stitch pattern more than the other one. So I decided to give cables another try, this time choosing a more "standard" cable. I am more pleased with the results this time.


Red bangle

I knit this one using Cleckheaton Country 8-Ply DK weight superwash wool yarn in a brown color. It is the same yarn I used to make my this scarf. I used 4.0 mm (US6) needles. I don't know what I was thinking but I started this one in the round, knit a few rounds, and then realized that what I really needed to do was knit a skinny strip. So I had to start this one over again. After I knit my skinny strip, I attached it to a red bangle like the one above.


Bangle #5

Here's what the bangle looks like on my wrist. I like this one so much more than the purple one I made that I might even make another.


My personal notes on how I made this bangle:

Cleckheaton Country 8-Ply, brown
4.0 mm (US6)
Red bangle.
Circumference = ~11.25 inches (29 cm)
Width (all around) = 3 inches (7.5 cm)

Cast on 16 stitches.
Row 1, 3, 7, 9: P4, K8, P4
Row 2, 4, 6, 8, 10: K4, P8, K4
Row 5: P4, Cable Crossing, P4

Repeat rows 1 to 10.

Cable Crossing: Slip 3 stitches to Cable Needle and hold in front. Knit 3 stitches. Knit 3 stitches from Cable Needle.

To get the cables to cross in the opposite direction, just hold the cable needle in the back.

----------<>----------

Bangle #6


Bangle #6

I decided to try another cable pattern for my next bangle, but something different than the basic cable I used in bangle #5. It took me a while to knit this one due to the thin sock weight yarn and itty bitty 2.75 mm (US2) needles. I think the color is off in the photo above because I took that photo at night with bad nighttime lighting. The yarn is Elann Sock It To Me, in latte color, which I picked up July specifically for this project (thanks Theresa for the suggestion!). Of course other stuff fell into my shopping cart, I mean, who buys just one ball of sock yarn??? I picked up some more of my favorite yarn, Elann Luxury Merino Superwash DK. For the cable pattern, I chose a cable pattern that was simply called "pattern 120" from NKSL pg 73. I think it turned out ok on the bangle. I like the cable pattern more than the one I used for the purple bangle. If the bangle above looks vaguely familiar, it is because you had seen it back in July. :-)


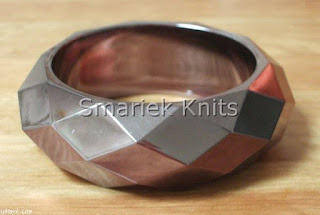
I was originally going to use a bangle with a silver/mirror finish, however decide not to when I didn't like how the silver showed through the tan colored knitting. So I used another one of these charcoal colored bangles instead. At this point I wasn't sure what I'd do with the silver bangle, maybe find a lacy pattern where the silver can intentionally show through and create a (hopefully) neat effect.


My personal notes on how I made this bangle:

Elann Sock It To Me, latte color 42837
2.75 mm (US2)
Charcoal bangle.
Circumference = ~11.25 inches (29 cm)
Width (all around) = 3 inches (7.5 cm)

Cast on 26 stitches.
Row 1, 5: P7, K2, P2, K4, P2, K2, P7
Row 2, 4, 6, 20: K7, P2, K2, P4, K2, P2, K7
Row 3: P7, K2, P2, CB4, P2, K2, P7
Row 7: P7, FC, CB4, BC, P7
Row 8, 18: K9, P8, K9
Row 9: P9, BC, FC, P9
Row 10, 16: K9, P2, K4, P2, K2
Row 11: P7, BC, P4, FC, P7
Row 12, 14: K7, P2, K8, P2, K7
Row 13: P7, K2, P8, K2, P7
Row 15: P7, FC, P4, BC, P7
Row 17: P9, CF4, CB4, P9
Row 19: P7, BC, CB4, FC, P7

Repeat rows 1 to 20.

CB4: slip 2 onto cn hold back, k2, k2 from cn
CF4: slip 2 onto cn hold front, k2, k2 from cn
BC: slip 2 onto cn hold back, k2, p2 from cn
FC: slip 2 onto cn hold front, p2, k2 from cn

To be continued... Click here for Part 3.

Copyright © Smariek Knits 2005-2009. All full copyright rights are reserved by Smariek Knits.
.

Monday, January 26, 2009

Testing 1 2 3

.
Happy CNY!


I am easily side tracked. I thought I'd try to do two things together by learning magic loop while test knitting Paula McKeever's new mitt pattern. I understand that you need one circ for ML so I went to my Poor Man's needle storage to fish out a 2.75 mm. After opening the flap, I remembered that I recently got this needle set and know that the cord is very flexible. Then I remembered somebody advising me to try out all the needle tips with all the cords because she had one tip with bad threads and one cord with bad threads. I fished out the nedele set and started screwing and unscrewing all the tips and cords. I must admit that I got a little lazy. I tried both tips of one size with all ends of all cords. It was such a tedious task that I ended up trying both tips of each remaining size on only both ends of one of the cords. Yep, Parresseuse is my middle name. Then I realized that the needle set only contained size US4 up to US 9 or 10 or something like that. And what I wanted was US2. Well that didn't work out for the test mitt. So back to my PMNS for a regular circ in size 2.75mm. The longest one I had was 32 inches.

I proceeded to CO 64 sts, split the sts, pinched the cord & pulled it out. Ok, now how do I join in a round when the needle tips are parallel?! When I knit in the round using 2 circs, I just swap the 1st & last sts. Well, I turned my work around so that the half with the working yarn would be in my right hand, and just started knitting my first round. And knit around I went, until I reached the end of my round and found a strand hanging between the beginning of the round and end of the round -- it was 2 inches long!!!

Whoopsie!


Then I started over with a few 2.75 mm pointy sticks (didn't want to risk another ML failure at this point), knit a few rounds and decided that 64 sts was still much too large. I didn't think the ribbing and cable pattern would pull inwards enough to make it fit my small hands.

I've started over a 3rd time. This time using 3.0 mm pointy sticks and 52 sts for the ribbing. The pattern repeat was 11 sts, so 64 - 11 = 53. And there is a 2 st increase after the ribbing section, which would make the target st count 55. I could have co 56 for the ribbing and then reduce by 1 st. I decided to go with co 52 for a snugger fit, and then increase 3 in the last ribbing round. I think this will work out...

In retrospect, I should have known from past experience with this yarn that I should have co between 50 to 56 sts to fit my hand.

Well that's it for now. It's been busy on this end. I did manage to get my eyes examined, it has been a while cough4to5yrscough since my last. The good news is that nothing has really changed. The right is still bad and the left is still worse, but the diopters have remained the same as before. Well, there is one wee little change in axis for one eye. I'm not sure why there is this slight difference. I suppose I could get away with not getting new glasses. However the desire for new scratch-free lenses and an updated frame won out. The downside is that clip-on shades have fallen out of favor which meant having to choose separate prescription sunglasses. This means I have to carry a big eyeglass case for the sunglasses instead of a thin sleeve for clip-on shades. I know, it should be no biggie except that purse real estate is hard to come by when I'm hauling all my "pursy" stuff along with all of Missy's stuff. It'll be about 10 days before my glasses are ready.

Copyright © Smariek Knits 2005-2009. All full copyright rights are reserved by Smariek Knits.

.

Thursday, January 22, 2009

Angelina Cable Fingerless Mitts Pattern

.
Related posts:
22Jan2009 post (Angelina Cable Fingerless Mitts Pattern download page)
14Jan2009 post (3 Photos - Adult Size)
11Jan2009 post (3 Photos - Kindergartener Size)
07Jan2009 post (1 Photo - Kindergartener Size)
05Jan2009 post (2 Photos - Toddler Size)
04Jan2009 post (3 Photos - Toddler Size)


I've received requests for the pattern for the basic mitts you saw here, here, and here. I've been trying to type up an outline all week, but it's been a crazy week and I hadn't had time to sit down and do it until now (plus my short attention span didn't help). Well, here it is:


Well that's all for now, just a quickie post. Gotta go watch CSI live cuz Tivo is busy recording 2 hrs of Bones tonight (followed by Burn Notice). Gotta hate when shows overlap!

Copyright © Smariek Knits 2005-2009. All full copyright rights are reserved by Smariek Knits.

Monday, January 19, 2009

sans aiguille

.
Related posts:
28Mar2009 post (shoe shot, 1 photo).
07Feb2009 post (finished pair, 11 photos).
30Jan2009 post (4 photos).

There's a bit of a crisis Chez Smariek. One of my DPNs seems to have gone awol. I was planted on the sofa with a throw over my lap, knitting with 5 pointy sticks and had set down one of them on my lap (viz. on top of the throw). That DPN went missing moments afterward and I could not find it. Where did it go?! I need it!!!

It couldn't have gone far. I didn't think it had fallen onto the floor because I would certainly hear metal clanking against hard wood. I looked on the floor and under the sofa, nope not there. I looked around me on the sofa and even checked under the cushions, no joy. Just bunnies of the dust variety, missing pen from one of Missy's writing tablet thingies, and crumbs. I even vacuumed while I had all the cushions off the sofa! Feeling good about that accomplishment. Still no missing pointy stick.

DH even helped me look for it. He tells me that the needle has gone the way of Tyler Durden (in this movie, Fight Club) and had never existed. Ok, I am not smoking the carpet. I know my Knit Picks Nickel Plated DPN set came with 5, not 4, pointy sticks -- you can see it here. Five, I say!!!

Practice Pair of Socks #1, Sock #1


Here's what I had been working on until I got derailed by the missing pointy stick. Ma première chaussette! Learning how to do this is one of my goals for this year. And instead of trying it out with some thick yarn and big needles, I jumped right in with sock weight yarn and 2.75 mm pointy sticks.

There's a link to an online sock tutorial, Silver's Sock Class, in the Knitting Resources section of my blog sidebar; I've heard that this tutorial is quite good, however I don't like trying to knit while following instructions on my computer screen and I don't own a printer to print out the tutorial. I'm one of those people who needs printed material in front of me. So I managed to borrow a sock book which has lots of illustrations and I got a very good idea of how a sock is constructed. The only downside of the book is that it has some discrepancies/errors in it which can really throw you off if you don't catch them. I think the book is fairly new, it's dated 2008, so they probably haven't gotten around to releasing a newer edition with the corrections.


The beginning was quite easy. It's very similar to starting a mitt. I began with K2P2 ribbing and thought I would continue this throughout the leg...

You spin me right round, baby
Right round like a record, baby
Right round round round
- 'You Spin Me Around' Dead or Alive


... but as you can see, I switched to stockinette. Round and round we go. I knit so much faster in stockinette than in K2P2 ribbing. I chose K2P2 over K1P1 for the same reason. So far so good, except for ...


... a loose stitch due to one of my needles wrapping around the yarn causing a sort of "YO" effect. There's a tendency for this to happen at the end of a needle and I don't catch it until I've knit around and come back to that point.


I also have difficulties avoiding the laddering effect. Here are 2 (out of 3) ladders on my sock. The strange thing is that I always think the ladder should occur between the V stitches. Like this:

\/\/_\/\/

But instead, mine always occur right inside the V stitches, resulting in a split like this:

\/\/\_/\/\/


Here's the leg. I later tried to reduce the laddering by shifting a couple of stitches from needle to needle as I went around. This was slightly ameliorated on the side closest to the heel (where the stitch markers are).


The heel flap wasn't difficult at all. Here are pics of the front & back.


Now this was a MAGICAL experience! That's the best way to describe the turning of the heel. I read about the theory of sock construction and it didn't quite "click" until I actually did it.


And here we are after completing the gusset shaping. This was a little tricky for me because I didn't concentrate as well as I should have. Instead of decreasing every other round, I might have decreased every 3rd round here and there because I lost track of which round I was in. Yes I know, I'm only repeating 2 rounds! I can't explain why it is easier for me to increase every other round (as in a mitt gusset) than to decrease every other round.

I still need to find that 5th needle. Definitely before I start the toe decreases, I think...

Copyright © Smariek Knits 2005-2009. All full copyright rights are reserved by Smariek Knits.

1.75

Saturday, January 17, 2009

HUGe - Part 1

.
This is Part 1 in a series on the 2008 HUGe swap.
Click here for Part 2.
Click here for Part 3.
Related post: 08Jan2009 post - 21 Photos - Elann HUGe 2008 Swap, Group 1 box

The Elann HUGe Swap has been going on for some years now. This is my first time participating in it. I never participated before because I didn't have time. This year (2008), I thought I could squeeze in some time to do this, but I found I lacked any creativity to come up with a project for the swap. Thanks to T, I did find something that looked both fun and do-able. And here's the end result:


10 bangles

It's a project based on this Swatch Bangle pattern. I'm clueless. Call me Ms. Unfashionable. I had no idea that bangles are the "in" thing. Vicki told me this when I mentioned the Elann HUGe swap to her back in May. Well ok, I think I can make my own and it sure as heck won't cost me $140 to $180 to make each bangle. I managed to find the bangles for about $6.50 each. Yay!

It all started with these:


20 Bangles

I only needed to make 10 items for the swap. Notice that there are 20 of them in the photo above. I must have felt optimistic when I picked up these bangles! They are black/white, red metallic, red transparent, brown transparent, black, charcoal metallic, and silver.

----------<>----------
Bangle #1:


Bangle #1

It all started with this bangle:


Brown bangle

This brown bangle is somewhat transparent. The interior side is smooth, the exterior is faceted. At first I was unsure of how this would work out in the end for this project. Surely smooth interior and exterior sides would make this much easier.

I used Elann Highland Wool in Ruby color and 4.0 mm (US6) needles to knit this one. I thought I would start off with something simple for my first bangle. The stitch pattern is seed stitch. I did not want to knit the width of the bangle and then have to seam both the width AND the bangle circumference. No no no. We could not have that. I am lazy. So I worked this in the round (around the circumference), and knit as many rows as necessary to obtain the width (around the front & back) I needed, then I merely had to seam it once along the circumference.


Seaming up the bangle

Seaming was tricky since I found it difficult to see what I was doing. I think I need better lighting in the family room where I do my knitting.

My personal notes on how I made this bangle:
Elann Highland Wool, Ruby Red.
US 6 (4.0 mm)
Brown bangle.
Circumference = ~11.25 inches (29 cm)
Width (all around) = 3 inches (7.5 cm)

Cast on 52 stitches, join in round.
Round 1: * K1, P1 *
Round 2: * P1, K1 *
Repeat Rounds 1 & 2 until 22 rounds total have been completed.

Cut yarn leaving 35 inches of yarn for seaming. There was 18 inches of yarn left after seaming. So I used 17 inches of yarn for seaming.

ETA: This bangle went to Benne.

----------<>----------

Bangle #2:


Bangle #2

This is Bangle #2.


It all started with this bangle above. It's sort of a charcoal grey metallic finish.


This one took me much longer than many of the other bangle because it took me 2 tries before I got the width correct and I had to frog it once due to a glaring mistake. It also didn't help that I was using sock weight yarn and size US2 needles. This meant working a greater number of stitches which made it felt like I would never finish. Then once I got into the rhythm of the cable pattern, I was so carried away with it that I knit the piece much too long! Seaming also seemed to take a while but that was because Miss M was squirming next to me which made it difficult to concentrate. I wasn't too happy with the seaming as it is more obvious than I would like. It's due to having to seam across the width of the bangle since I could not knit this cable pattern in the round (as I did for Bangle #1). Overall, the finished piece didn't come out exactly as I had imagined it would when I saw the cable panel in BW3 (Chain Link Cable). I think this might be due to the cable panel stretching (up/down-wards) when it is placed on the bangle. The knitting (before attaching to bangle) looked better when stretched out laterally left/right.


A few years ago, I imagined learning how to knit socks so I picked up 2 balls of sock yarn with the intention of doing this. Fast forward a few years later. Have I knit any socks? Nope. None at all. So I decided to use some of this sock yarn for the bangle. I started out with US1 (2.25 mm) needles then restarted using US2 (2.75 mm) which looked a little better to me. Since I could not knit this in the round, I ended up having to seam twice.


I love this cable pattern. It has a very interesting look. Despite having to use 2 cable needles to work the pattern, it is not difficult at all.

Personal notes on how I made this bangle:
Sock It To Me, in purple
US 2 (2.75 mm) & 2 cable needles
Charcoal Grey Metallic bangle.
Circumference = ~11.25 inches (29 cm)
Width (all around) = 3 inches (7.5 cm)

Cast on 25 stitches.
Row 1, 3, 5, 7, 9, 11, 13, 15: K8, P9, K8
Row 2, 4, 6, 10, 12, 14: P8, K9, P8
Row 8: P8. Slip 3 to CN1, hold in Front. Slip 3 to CN2, hold in Back. K3. K3 from CN2, K3 from CN1. P8.
Row 16: P8. Slip 3 to CN1, hold in Front. Slip 3 to CN2, hold in Front. K3. Pass CN1 to the Back. K3 from CN2. K3 from CN1.
Repeat rows 1 to 16 until piece is long enough to fit around bangle (~11 inches).

ETA: This bangle went to Marta.

----------<>----------

Bangle #3:


Bangle #3

I really liked how Bangle #3 came out. I'm pretty sure part of it was knitting with my favorite yarn, Elann's Luxury Merino Superwash DK yarn. This yarn is very soft in my hands. Here are two photos of the yarn. I don't think either really captures the true color of Capri Blue.


Elann Luxury Merino Superwash DK, Capri Blue


Elann Luxury Merino Superwash DK, Capri Blue

I chose to knit this in the round in order to avoid seaming twice. I probably would have knit this with 3.75 mm (US5) needles if I found 2 available circulars. Unfortunately I could only find one 3.75 mm circ, so I knit this with two 4.0 mm (US6) needles instead. I'm pretty certain that two of my 3.75 (US5) circular needles are tied up on the toddler mitten last seen in my December 24, 2006 post and December 25, 2006 post! Please don't ask me where the mitten is. It was lost before we moved house, and got further lost (is that possible?) during/since the move. Yes, by the time the mitten resurfaces, it will be too small for Miss M to wear.


Bangle #3 is also made with a charcoal grey metallic colored bangle, like the one above.

Anyhow, I don't think it is any coincidence that I chose the Double Broken Rib pattern for Bangle #3. I definitely like it as it is the second time I have used it. The first time was in my first Cuzco scarf, which I dubbed the Cozy Bathrobe Scarf because this yarn is very soft, however you never would have guessed since since the stitch pattern doesn't show through well on the fluffy Cuzco yarn. Really! If you look at this bangle and then look at the scarf, you'd say, "No way, those two can't be the same stitch pattern!"


My personal notes on how I made this bangle:

Elann Luxury Merino Superwash, Capri Blue
4.0 mm (US6)
Charcoal Grey Metallic bangle.
Circumference = ~11.25 inches (29 cm)
Width (all around) = 3 inches (7.5 cm)

Cast on 56 stitches, join in round.
Round 1 & 2: Knit
Round 3 & 4: * K2, P2 *
Repeat rounds 1 to 4 for 26 rounds total.
ETA: This bangle went to Bets.
----------<>----------

How many stitches to cast on?

If you're wondering how I arrived at the number of stitches to cast on for my bangles, it is a factor of trial & error and rough guesstimates.

I'll use Bangle #3 as an example. Here are some known facts:
Bangle circumference is 11.25 inches.
Yarn ball band gauge is 21-22 sts = 4 inches.
Knowing these two facts and assuming I'll be knitting close to ball band gauge, I do the following calculation to figure out how many multiples of 4 inches there are in the circumference of my bangle (11.25"):
11.25" divided by 4" = 2.8125 inches
Now I take the result (2.8125") and multiply that by the ball band number of stitches per 4" (which is 21 to 22 sts):

2.8125 x 21 = 59 stitches
Since my stitch pattern is a multiple of 4, I need to cast on a number that is divisible by 4. Some possible options include:
60 stitches (4 x 15 = 60)
56 stitches (4 x 14 = 56)
I decided to go with the smaller number because I didn't want my knitting to be too large and have my bangle resembling a Shar Pei after seaming.

I don't know how other people determine their number to cast on. Please let me know if you know an easier method.

The calculation is much easier if I were knitting a long skinny strip of knitting instead of knitting in the round. Since it is 3 inches around, all I would need to do is take the ballband sts per 4 inches", divide by 4 to get the sts per 1 inch, and then multiply by 3 to get a balpark value of how many stitches I should cast on.


To be continued... Click here for Part 2.

Copyright © Smariek Knits 2005-2009. All full copyright rights are reserved by Smariek Knits.

.

Wednesday, January 14, 2009

Angeline Cable Mitts - Peach

.
Related posts:
22Jan2009 post (Angelina Cable Fingerless Mitts Pattern download page)
14Jan2009 post (3 Photos - Adult Size)
11Jan2009 post (3 Photos - Kindergartener Size)
07Jan2009 post (1 Photo - Kindergartener Size)
05Jan2009 post (2 Photos - Toddler Size)
04Jan2009 post (3 Photos - Toddler Size)


Yarn: Elann Highland Wool, autumn peach
Needles: 4.5 mm (US7)

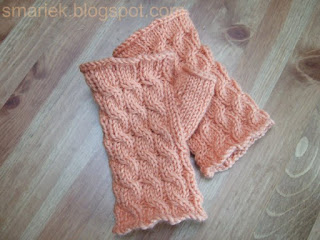
The peachy mitts are finished. It's made with the same yarn, Elann Highland Wool and color as my Shadow Cable Scarf. I modified the pink kindergartener sized mitts slightly to make them adult sized. They fit my hands, which means a small ladies hand.


This photo was taken yesterday after Missy & I played with playdoh. Since many of the colors had dried up, I had to add water and knead them. There's still a tinge of blue/green after washing my hands. You should have seen my hands before I washed them!

Just to recap...

This peach adult size is modified from the pink kindergartener sized version I made:
11Jan09 post (finished mitt, 3 more photos)
07Jan09 post (left mitt, 1 photo)

The pink kindergartener size is modified from the short purple toddler version I made:
05Jan09 post (finished mitt, 2 more photos

04Jan09 post (how mitts began, 1 photo)

I haven't gotten around to writing up a "how to" for these mitts. They're so ridiculously basic that you can just wing it as I did.

Do you remember the loopy piece of yarn on Missy's purple Pythagorean Hat? (boo boo seen here; Pythagorean Hat pattern here) Well, I managed to fix that little boo boo with a crochet hook and some patience. That was easy! Now I've got a more serious problem with her purple Asherton Toddler Scarf. Look what I found! A hole!!!!! And SEVERED yarn!!!!


See those two yarny ends sticking up?


Anybody have ideas for fixing this mess? Can it be saved? Or does the scarf need to be tossed out?


On a happier note, here's something I received today. Knit Picks Nickel Plated Sock Size DPN set. I can't wait to try them out. Now you'd think that I'd have time to knit on those days when Missy goes to daycare. I envision myself sitting on the sofa, watching a little telly, and doing a little knitting. That has never happened! I always end up doing house things, running errands, etc. Those are rather crazy days for me. Perhaps I'll get to play with my new pointy sticks tonight.

Have a sweater project you've been meaning to start? Join the Fashionably Late KAL! Perhaps it'll give you the extra little push you needed to cast on or dig out that WIP.

Okeedokee, my time is up, gotta go!


Copyright © Smariek Knits 2005-2009. All full copyright rights are reserved by Smariek Knits.