Cable Mitts
.

Pattern: Four Rib Braid Cable Mitts (scroll down for download)
Yarn: Elann Highland Wool
Needles: 4.5 mm (US7)
Yarn: Elann Highland Wool
Needles: 4.5 mm (US7)
Scroll down for more photos.
I've been working on these cable mitts lately using the Four Rib Braid cable pattern recycled from two old projects of mine. After two attempts, I am finally happy with the way they knit up. These three are going to M's daycare teachers; the 4th pair (at bottom of post) was supposed to go to an Aunt but I missed the deadline. I was worried about finishing the lace scarves in time so I switched over to fingerless mitts. Much quicker project to knit. These can be knit in 2 days, one day per mitt. So this is a great project for last minute presents!

THE EVOLUTION OF A MITT
I enjoyed doing the "evolution" thing for my Sihnon Cable Scarf, so I thought I'd share how this mitt came about. :-)
THE CABLE BAG:

THE IPOD SOCK (inspired by the cable bag):

I guess I must have really loved the Four Rib Braid cable pattern because I decide to re-use it in an iPod Touch Sock (pattern outline on page) I made for my birthday prezzie. I use my iPod daily so I see this cable pattern when I take it out of its iPod Sock. It has become very familiar and one day I thought about how wonderful this would look on some fingerless mitts. Thus a mitt was born...
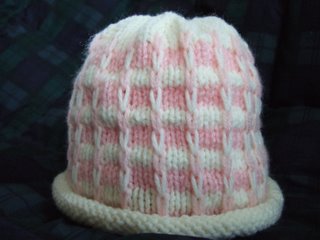
CABLE MITT #1 (not a bad start):

This pink mitt was my first attempt at applying the Four Rib Braid cable pattern to a pair of fingerless mitts. In my previous attempts to make mittens (Persephone Mitt, Regina Mitt, and even this plain mitt), I had always used a thumb gusset. This time I wanted to try that "afterthought" thumb I heard about from someone. The thumb was much easier to place, however I hated how it fit without the thumb gusset. It felt and looked like the thumb stretched out the knitting in a bad way. Though I will take a guess that most people would not notice or mind it.
After making the 1st pink mitt, I had a few ideas I wanted to implement to improve on it:
1. I wanted to improve on the ribbing so that there would be a seamless transition from ribbing to cable pattern (, which I did with its mate).
2. I wanted to try fewer stitches on the thumb because I thought the 16 stitch thumb was a wee bit too large.
3. I wanted to try stockinette stitch for the entire thumb because I did not like the 2 rounds of K1P1 ribbing at the top of this thumb. I had thought the ribbing would prevent stockinette from rolling, however I did not like how this looked using the worsted weight yarn (ribbing at the top of my thumbs using fingerling weight yarn seems fine to me). I'm hoping/guessing that stockinette won't roll on something with such a small circumference.

Elann Highland Wool, Orchid Pink
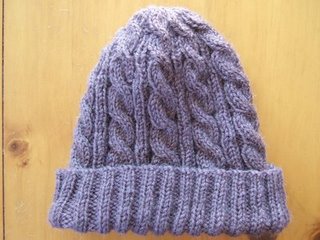
CABLE MITT #2 (improvements made):

Here's my second version of the mitt. In this purple mitt, I have implemented 2 out of 3 of my planned changes.
When you compare the purple mitt to the pink mitt, you can see how the ribbing is improved in the purple version. The ribbing transitions seamlessly into the cable pattern. This was a very easy change to make, just a matter of starting the ribbing with P2 instead of K2, and then decreasing/increasing one stitch in the very center of the cable pattern.
Oddly enough, after working in a thumb gusset for the purple mitt, I found 16 stitches to be the perfect number for the thumb. Who woulda thunk! So no changes here.
I did try using a complete stockinette thumb and I think it turned out well. I think it lengthens the thumb line. You know, kinda like how Stacy & Clinton (from What Not To Wear) recommend shorter tops to lengthen the leg line in your pants? Nevermind. I think I've been watching too much of that show lately...
BTW, if you want to know why the left wrist section is always "lumpy" in my photos, go here and read about it. :-)

Elann Highland Wool, Jacaranda
CABLE MITT #3 (failed experiment):

I was originally going to make my 3rd mitt, the blue mitt, larger than the previous two because I thought I had to do so to have it fit someone with much larger hands. In a previous post, I mentioned some ideas I was kicking around for making a larger mitt:
1. Cast on 44 sts (or maybe even 48 sts?) to make a larger mitt.
2. Make the palm side of the mitt ribbing (instead of stockinette) for more "stretch" factor.
3. More stitches in thumb to make it larger.
4. Pray that the mitt will fit. :-)

What I ended up doing was casting on 4+ stitches AND working ribbing on the palm side of the mitt (instead of the stockinette palm on the purple and pink mitts). This turned out too loose/large. The photo above shows the mitt fitting on the bottom of a Starbucks Grande size cold beverage cup. I am still not sure why I decided to combine these two together (4+ stitches and ribbing).
Other options for this mitt:
1. CO 4+ stitches and have stockinette on the palm.
2. CO same # of stitches and have ribbing on palm.
I had DH try on the purple mitt. He thought it was “loose”(!). I should also mention that he prefers a really snug mitt too. Anyhow, I guess the mitt is quite forgiving on hand sizes. I ended up making this blue mitt exactly the same as the purple mitt.
.

Here's a photo showing my thumb gusset. I should also mention that I tried a different sort of gusset on this mitt, it is constructed differently than the one I used for my other two mitts (this one and that one). Instead of starting off with two increase rounds of back-to-back increases, I started them around a single knit stitch.

Elann Highland Wool, Blue Vista
Well there you have it. Did I bore you with all these details?

Elann Highland Wool, Red Maple
This is Cable Mitt #4. Can you tell I enjoyed making these? :-)
Copyright © Smariek Knits 2005-2008. All full copyright rights are reserved by Smariek Knits.Well there you have it. Did I bore you with all these details?

Elann Highland Wool, Red Maple
This is Cable Mitt #4. Can you tell I enjoyed making these? :-)
.


of Cable Scarves")


8 stitch(es):
I always find it interesting to go through the process of "fine-tuning" a project, and it looks like you do, too! It was enlightening to go through your thought process with you. Cool! And all the mitts look great.
These are beautiful. I saw the pics on Ravelry and came to read your blog post. You make the most beautiful cabled projects. I'm so in love with them!
Hey-
Miss M will LOVE giving these to her teachers. Hope she doesn't start volunteering you to make things!!!
I love reading about you design process. The mitts look beautiful.
You make me want to knit cables, you know. And those harmony needles , I spotted them, I love mine too.
I still have one of your scarves on my immediate to do list... but I haven't done it yet. {{{sigh}}}
Lovely!! They're on my to-do list, but I'm presently OD'd on mitts. Thanks again for the great lessons in how to develop and fine-tune a pattern. Many holiday hugs!!
Marie, these are gorgeous mitts. You are so very generous with your talent. Thanks so much for the pattern. I am going to make some this week.
Thank you for the delightful knitting class and your insights on constructing your mitts - most enjoyable. I will have to put these on my to do list. You are such a generous person.
Post a Comment