Navigation Tips

Free Patterns can be seen along the sidebar (on right side),
or you can use the Free Patterns label to view all posts.

Free Pseudo-Patterns or Pattern Outlines can be found using the Free Pseudo-Patterns label.

The most comprehensive listing of Patterns, Pseudo-Patterns, and Pattern Outlines can be found on the Pattern Bibliography page.

Please read the Blog Housekeeping section in the sidebar for more info.

Thursday, February 28, 2008

Secret Blanket Project

About 5 months ago, a bunch of us got together to knit blanket squares for one of our friends in the Elann Chat group. There have been lots of communication under the radar to plan this, and we've all been bubbling with excitement about the project but couldn't really talk about it too much openly. We agreed on a color scheme, made sure to evenly distribute the colors among the knitters so we wouldn't have too many of one color, and agreed to make the squares to a certain gauge/size to make assembly easier. Bets compiled Blankie Tales which told stories about each square, and she posted tips for a successful blanket project here. This was a fun collaborative project.

Well, we can now finally talk about the Secret Blanket Project. :-)

No need to rehash what others have already said so well. You can read the stories behind Cheryl's blanket here:
http://libbyknitkins.blogspot.com/2008/02/cheryls-blankie.html
http://mymerinomantra.typepad.com/my_merino_mantra/2008/02/a-secret-blanke.html

Photos of finished blanket, click to enlarge:


There are photos of each square on Trish's blog, you can click on the squares there to get a larger/better view of each them. (You can see my square here.)

Tuesday, February 26, 2008

Eyelet & Bead


Just a couple more dishcloths knit in Eyelet & Bead. Can you tell I really like this lace pattern?


Pattern: Eyelet & Bead Cloth
Yarn: Lily Sugar & Cream, Midnight Magic color, 1 ball
Needles: 4.5 mm (US7)

I knit this one way looser than the others I made, however I know it'll all "settle" after I give it a wash. I seem to have a knack for shrinking my dishcloths. Miss M helped a little with knitting this one. She wanted to try, so I sat her on my lap and we worked the knit rows together. I like this colorway because it's a little different from the usual ones, but I was a little disappointed that I couldn't get away from the ubiquitous zig zag pooling I often get with the variegated yarns. I was hoping for the kind of pooling I got from the red/white/blue one I made last July. I really love the results of this cloth and I think it looks good in both solid and variegated yarns. The only thing that kills me are the P2Tog-TBLs on some of the wrong side rows. P2Tog-TBL is not difficult to do, although it is a bit more challenging on cotton yarn. (Click here to see video for doing P2Tog-TBL)


Pattern: Eyelet & Bead Cloth
Yarn: Lily Sugar & Cream, Country Sage color, 1 ball
Needles: 4.5 mm (US7)

Same pattern, different color. You'll get a better look at the pattern from one knit in the solid green colored yarn.

I don't use these as dishcloths like most(?) people do. They get used around the house. Wiping the kitchen counter. Tea mug/teapot coaster (the reason why my used cloths have dark tea stains on them!). Cleaning the window blinds. Stuff like that.


Yarn info:
Fibre Content: 100% cotton
Made In: Canada
Care: Machine Wash and Dry
Gauge: 20 st/4 inches 4.5mm (US7)
Yardage: 95 yds
Size: 57 gm (2 oz)
Price: $2.29

--<>--

Back in December, I noticed that the T-pins I picked up some months before that from one of those big office supply stores (Office Depot? Staples? Office Max?) turned rusty on me. I got some great suggestions for blocking pins, and one of them was quilting pins. When it was mentioned to me, I had no idea what that meant or how they were different. Then I stopped by Jo-Ann and looked at pins in the sewing aisle, an aisle I had never looked at before because I don't sew. I saw T-pins in little packages of 40 pins. I would need 5 or more of those packages. Then I looked at some of the other pins hanging on the wall. I saw "crafting" pins in 250-pin packages, which came in round multi-colored heads. I saw "quilting" pins in 175-pin packages, all yellow colored heads. Both of these were exactly the same as far as I could tell, the only difference was the pin head color. So I'm not sure why the crafting pins are marketed differently from the quilting pins. Both packages even listed them as being the same length. I was going to go with the 250-pin pkg of crafting pins ... until I looked down and saw this box of 500 quilting pins:


Well, the decision was a no-brainer at that point. I came home with this box of 500 pins which should be enough to block any project. I am a happy camper again. :-) I just hope these don't turn rusty on me. The label says they are "nickel plated", does that mean "rust proof"?

--<>--


This is the vest I've been working on (forever), for my mom. You last saw it here. The photo above shows the back section almost complete, it's about 8 rows short of bind off. I'm a bit worried about the vest being too short. But I couldn't lengthen each block section by 4 rows each (a total of 20 rows) because the vest might end up too long. I'm hoping I can lengthen it a bit during blocking. I haven't yet figured out whether I should block first then seam, or seam first then block. The armhole shaping was a bit tricky for me since I can't quite focus on following the block pattern AND working the decrease instructions concurrently. It was hard to keep track of so I wrote down the block row instructions with the decrease sections next to it so I'd know which rows to do the decreases. Yes, checklists work well for me.

I feel like I've been knitting this vest forever because I kept frogging and starting over. I am so sick of this yarn color.

--<>--

IF YOU DON'T WANT TO READ ABOUT TODDLER BODILY FUNCTIONS, YOU SHOULD STOP HERE. :-)

Ok, we've been trying to potty train Miss M for quite some time. It's only been in the past month or two when we made the most forward progress. We've gotten to the point where she can pee in the toilet and sometimes tell us when she needs to go, but usually we have to keep checking with her or encourage her to go anyways. She's gotten very good at holding it in until we make it to the toilet. Now the frustrating part is the poopoo part of potty training. She doesn't want to do it in the toilet. So for a short while she worked it out so that she would go in her pull-up diaper during naptime or just before we go get her in the morning. Now she insists on wearing her panties during naptime, no pull-up diaper. And for several consecutive days, I've gotten her from naptime with poop in her pants AND nuggets scattered all over the carpet in her room. Ugh. This gets old fast. I'm thinking we should have gotten linoleum in her room, and also added a drain hole in a discreet corner so we can just hose down her room, lol.

I hope this isn't going to take too much longer to completely potty train...

Ok, I'm done ranting about this. :-)

.

Friday, February 22, 2008

Photos of hat & mitts

Check out Donna's blog for a super easy contest.

--<>--

Not much to say. Just wanted to share some photos. I finally got T to model the mitts & hat I made him.


.


This is Thomas modeling the Jayne Cobb Hat which I made him last year but didn't get around to giving it to him until this month. I actually made two of these hats. DH wears the other one. I need to get more red/orange/yellow yarn to make myself one. Unfortunately Elann has discontinued the orange (burnt orange) and yellow (freesia) colors I used to make this hat. So I will have to figure out another combination of colors. I was thinking of pottery red, pumpkin and allspice:


I have tons of the same Ruby red I used in the hat, however I've started to think that the Pottery Red might be a better match. This is the Ruby:


--<>--

At dinner tonight DH asked, "Should you be eating raw fish?" We were having seared ahi tuna. How raw is seared ahi tuna? I told him it was partially cooked. ;-) However I did make a point of avoiding raw fish during my first pregnancy (much to my disappointment since I love love love sashimi). But yeah, technically the middle section is undoubtedly raw.

.

Thursday, February 21, 2008

Oh dear

February 21, 2008 ... marks the day when Miss M finally figured out how to open the door to her room. Some doors in our house are harder to open than others, and the door to her room was one of these.

It'll be interesting to see what happens tomorrow morning. I wonder whether she will come over to our room, pat us with her little hand and say, "Mommy, wake up!" or better yet, walk over to DH's side and say, "Daddy, wake up!"

--<>--

I'm convinced that my body is catching up with my age. There seems to be some new ailment each year. At the end of last year it was a breast rash. That is not a good place to have a rash. After moving house, I finally managed to sit down and choose a dermatologist to take a look at this. I saw Dr. G in Sept who prescribed Aclovate which helped for a while, and then the itching came back. Then I received a bill from Dr. G for $250 which was NOT covered by insurance because she turned out to be "out of network". However the Cigna website still showed her as "in network" when I called about this in Oct; they told me that Dr. G was out of network since July. Ok, so I wasn't smoking crack when I picked her out of the list in Sept. So I needed to find a different doctor who was "in network", but I didn't want to risk choosing one from the list that appeared to be "in network" and then run into the problem of them not being in the network. I noticed that they had some doctors listed that would be "in network" starting on Jan 1, 2008, so I decided to wait until after the new year before making an appt with one of them. Just to be safe.

I saw Dr. C in Jan about the rash and she prescribed Elidel. The rash has gotten better after a month. She said I could continue to use Elidel now and then when needed, that it was "Category C" for pregnancy, which means its safe to use for pregnant women. Good to know.

I'm just full of skin issues these days. I'm not sure if part of it was from the move to our new city which is much drier than the old city. I had a new rash breakout the day before Chinese New Year, on my chin and around my mouth. It was not good for the first week, but now it is more tolerable and only bothers me a little now and then.

And today, Dr C did a biopsy on a suspicious looking mole on my breast. I thought this was going to be a painful process. It actually wasn't bad at all. She's really good! I'll get results in a week or two, and I have to go back to get the stitches removed.

My appt with Dr H is next month, to verify that I am actually pregnant. Dr. C told me that those home pregnancy tests are pretty accurate (and I certainly feel pregnant!). Since my OB appt was late next month, Dr. C offered to send me to the lab in the medical building to have a blood test. Tempted, but I declined. I certainly feel pregnant. Most of all I didn't like the thought of being poked with a needle. Yeah, I'm a wimp. Anyhow, I'll get more than my fair share of needle poking in the coming months...


.

Warm Hands, Warm Thumbs


Pattern: Warm Hands, Warm Thumbs (outlined below)
Yarn: Elann Highland Wool, Ruby color, 1 ball
Needles: 4.5 mm

I've been working on my 4th mitt, which is based on the first mitts I ever knit. The only difference is that I cast on 40 stitches to make a larger mitt that will fit a man's hand and I am working a wrap around thumb (which maintains the K2P2 pattern). You can follow my process by reading post1 and post2 before this one.


I finished the first mitt of this pair (photo above) and it came out well. It looks long on my hand, nearly reaching the tips of my fingers, but it'll be perfect for a man's longer hand.

This (photo below) is the second mitt of this pair, just after binding off the main section, but before knitting the wrap around thumb.


When I first designed the thumb gusset, I thought I could increase until I had 8 stitches. After several tries, I came up with this:


I knit this section while sitting in bed. When I got to my 8 increase stitches I realized that this was not large enough. So I had to figure something out. Not wanting to get out of my nice cozy warm bed (lazy me), I managed to find a small section of scratch paper within reach that was not already scribbled on and continued working up from there to work out the increases up to 12 stitches.


I continued increasing until I got 12 stitches and thought that was a good stopping point. It would be perfect after picking up 4 stitches, for a total of 16 stitches around the thumb so that I can continue the K2P2 ribbing around the thumb. (Cuz you need it to be divisible by 4 to keep the K2P2 ribbing pattern going around the thumb.)

I think I did a neater job of knitting the thumb gusset on this second mitt. The first one was a bit more sloppy. Nobody would really notice though. Just me.


My notes on knitting the mitt. You can't see Row 10 where I wrote "slip 8 onto waste yarn", then crossed it out and rewrote Row 10 to continue the thumb gusset increase because the watermark is just over that line. (I had to start putting watermarks on my photos because I began to see my photos popping up on other people's websites. And if that isn't bad enough, some people are linking directly to my blogger photos instead of saving their own copy to their space).


Here is the 2nd mitt of the pair (yes, it looks a bit long on me; I made them longer because they're for someone with much larger hands):


I think I did a better job with the second mitt, the thumb gusset looks better:


Here's the finished pair, just in time for gifting tomorrow:


.

Here's what I did to knit these:
Using 4.5mm needles, cast on 40 stitches (36 stitches for women's mitt), join into round.
Work K2P2 ribbing for 20 rounds.

Start thumb gusset (purple indicates the thumb gusset section):
1: * K2, P2 * across round
2: K2, P2, M1P, M1K, * K2, P2 *
3: K2, P2, P1, K1, * K2, P2 *
4: K2, P2, M1P, P1, K1, M1K, * K2, P2 *
5: K2, P2, P2, K2, * K2, P2 *
6: K2, P2, M1K, P2, K2, M1P, * K2, P2 *
7: K2, P2, K1, P2, K2, P1, * K2, P2 *
8: K2, P2, M1K, K1, P2, K2, P1, M1P, * K2, P2 *
9: K2, P2, (K2, P2) twice, * K2, P2 *
10: K2, P2, M1P, (K2, P2) twice, M1K, * K2, P2 *
11: K2, P2, P1, (K2, P2) twice, K1, * K2, P2 *
12: K2, P2, M1P, P1, (K2, P2) twice, K1, M1K, * K2, P2 *
13: K2, P2, (P2, K2) three times, * K2, P2 *
14: K2, P2, slip 12 stitches onto waste yarn, * K2, P2 *

Work K2P2 ribbing for 15 rounds. (knit until desired length; I use 10 rounds for women's mitt & 15 rounds for men's mitt)
Bind off in K2P2 pattern.

Thumb:
Put 12 stitches onto two needles.
Pick up 4 stitches around thumb hole using 3rd needle.
Work P2K2 ribbing for 8 rounds. <-- Note you start with P2
Bind off in P2K2 pattern.
M1K is an increase that is a knit stitch. I used whatever method, depending on the stitches adjacent to where I wanted to insert the increase, that seemed to create less gap.

M1P is an increase that is a purl stitch. I used whatever method, depending on the stitches adjacent to where I wanted to insert the increase, that seemed to create less gap.

Note: The mitts are interchangeable, so you can just make two identical mitts. However if you want a little more "symmetry", you can work it as above for the left mitt. And then for the right mitt thumb gusset, work the pink thumb gusset sections in the reverse order (after working a K2). And when you later pick up the thumb, you'll just start the ribbing with K2 P2; it'll be evident when you're looking at your knitting. :-)


Stitches used in these fingerless mitts include:
Knit-Two Purl-Two Ribbing, BW1 pg 39

.
Yarn info:
Fibre Content: 100% Highland Wool
Made In: Peru
Care: Hand Wash/ Dry Flat
Gauge: 19 st/4 inches 4.0 - 4.5 mm (US 6-7)
Yardage: 100 m (109 yards)
Size: 50g (1.75 oz) ball
Price: $2.38 USD
.

Wednesday, February 20, 2008

One down, another to go

I just want to take this opportunity to point out to all my readers that I have a Pattern Bibliography post here:
http://smariek.blogspot.com/2007/11/pattern-bibliography.html
which enumerates the stitch patterns I use for many of the things I've knit.

I've tried to list the stitch patterns I use in my pattern post AND add a link to this Pattern Bibliography post to all my pattern posts for anyone who is interested. The info is there if you read the pattern post and Pattern Biblography post. I am pointing this out because it has been brought to my attention that some people don't think this is being made clear. I think they must not be reading the pattern post because the info is there.

In the pattern posts, you will find a section that starts with "Stitches used..." followed by an enumeration of the stitch patterns used. The words "Stitches used" is a link to the Pattern Bibliography post, you just have to put your mouse pointer over those words and click on it. I think the link works for most web browsers, however I'm not absolutely certain. I've only tried it on Mozilla Firefox and Internet Explorer. I don't have any other web browser flavors to test this out.

I also want to point out that I've never seen anyone else post a pattern bibliography like this for their patterns. And most patterns I've seen don't even cite the stitch patterns they use. So I feel rather singled out on this matter. Yet, the info is there in my pattern posts.

Ok, I'm done ranting here. Sorry. I'm feeling hormonal today.

--<>--


You saw the beginning of this mitt here. Since then, I've finished Thomas' first mitt. Yes, it is on the long side for my hand, but the length should be fine for a man's hand.

Below, you can see the thumb I made. I'm happy I managed, more or less, to keep the K2P2 ribbing going up the thumb. It's normally easier to knit in worsted weight yarn than fingerling weight yarn, so I can't explain why I found it more difficult to knit this 12 stitch thumb section in worsted weight yarn than it was for me to knit the 24 stitches around the thumb (of Persephone & Regina) in fingerling weight yarn. Must be one of those knitting oddities.


BTW, the stitch pattern I used in this mitt is K2P2 ribbing, that's from Barbara Walker #1, on page 39. (lower right of the right side page)


And you can find the same stitch pattern from Mon Tricot on page 5. (It's the 4th swatch on the right side page)


You can also find this stitch pattern in many other knitting resources too. It's even on the Knitting Fool site here.

--<>--

Chinese New Year was on Thursday, February 7 this year. Miss M got some red envelopes for the occasion. It's the custom to give little red envelopes filled with money to children. Besides the red envelopes, my mom also got her some chocolates, fish & coins, for their good meaning. They came from a little chocolate shop in Noe Valley (San Francisco) called Chocolate Covered located at 4069 24th Street, between Castro and Noe. They're next to the shoe repair shop. They used to be one block over, next to the locksmith shop & across from Tully's (this is the same block where Noe Knit yarn shop is located, which was formerly (decades ago) Colorcrane, a small art supply store). Sorry, no photo of the store front. And I am not going to drive 40 miles up to San Francisco to take a photo of it. But you can go to Google Maps, search for the address and then click on the "street view" link (underneath the photo) to see what the store front looks like.

The chocolates were wrapped up in a little bag with a nice red bow:


This is what you get when you open it up:

.

No, Miss M hasn't finished it all in one sitting.


.

Tuesday, February 19, 2008

Loving those thumbs


.
A little while back, I told Thomas that I would make him some simple thrash-around-the-house fingerless mitts that he could wear to keep his hands warm when he's in his cold apartment. I thought I'd do something as simple as my very first attempt at fingerless mitts, a simple tube with a thumb hole. Quick and easy, except for a little more guess work to make it fit a man's larger hand.

Then I made my second mitts ever, which had a thumb gusset, but no wrap around thumb section. For my third mitts, I decided to make an attempt at making a wrap around thumb section. And I liked the results! I liked the results so much that I've decided that having the wrap around thumb is well worth re-attaching yarn and having to weave in 4 loose ends later on. I went back and updated my second mitts to have the wrap around thumb like the third mitt.

So back to this mitt I'm making for Thomas. I'm still starting out with the Warm Hands Fingerless Mitts I made last month, except I will add a wrap around thumb. This mitt is different from Persephone or Regina (which both had stockinette gussets) in that I wanted to maintain the K2P2 ribbing in the thumb gusset. It took me several tries before I could get the thumb gusset increases correct and exactly where and how I wanted it ... ok, maybe not exactly, but to a point where they were acceptable to me. In the photo below, you can see it is essentially K2P2 ribbing there. At first I thought I would increase to 8 stitches. When I got to that point I realized that this would not be enough. So back to scribbling in my notes and then knitted up to 12 stitches. I liked how it turned out at 12 stitches so this is where I stopped to slip the stitches onto waste yarn (recognize the yarn from CBM's scarf?). I plan on picking up 4 stitches later to make an even 16 so that I can continue the K2P2 ribbing around the thumb.


The top photo above shows what I have knit so far. If the mitt were for myself, I would go ahead and bind off there since it looks long enough for my hands. However when I slipped this over DH's hand, it was clearly on the short side and could use another 10 or so more rounds. So there is a difference in length when knitting mitts for a man vs a woman. It shouldn't take me too long to knit another 10-ish rounds and then work the thumb section.

Yes, this is the same yarn as the other mitt I made. Elann Highland Wool in Ruby Red. The red is the same yarn I used in his Jayne Cobb Hat. Anyhow, I hope to have these mitts finished by Friday when we will meet for dim sum lunch.

--<>--

It's American Idol season again and the Top 12 guys got to sing tonight. Unfortunately I only had time to watch the first hour, and will try to watch the second hour tomorrow night. Good thing I've got Tivo. :-) Anyhow, so far my fave is David Archuleta. We'll see what I think after watching the second half of the show. Of course by then it'll be too late to vote, which is usually the case with me and American Idol. I'm always watching it a day or two behind everyone else.


.

Monday, February 18, 2008

Twisted Ropes


.
Pattern: Twisted Rope Scarf from CatBookMom
Yarn: Elann Highland Wool, Blue Vista, 4 balls
Needles: 4.5 mm

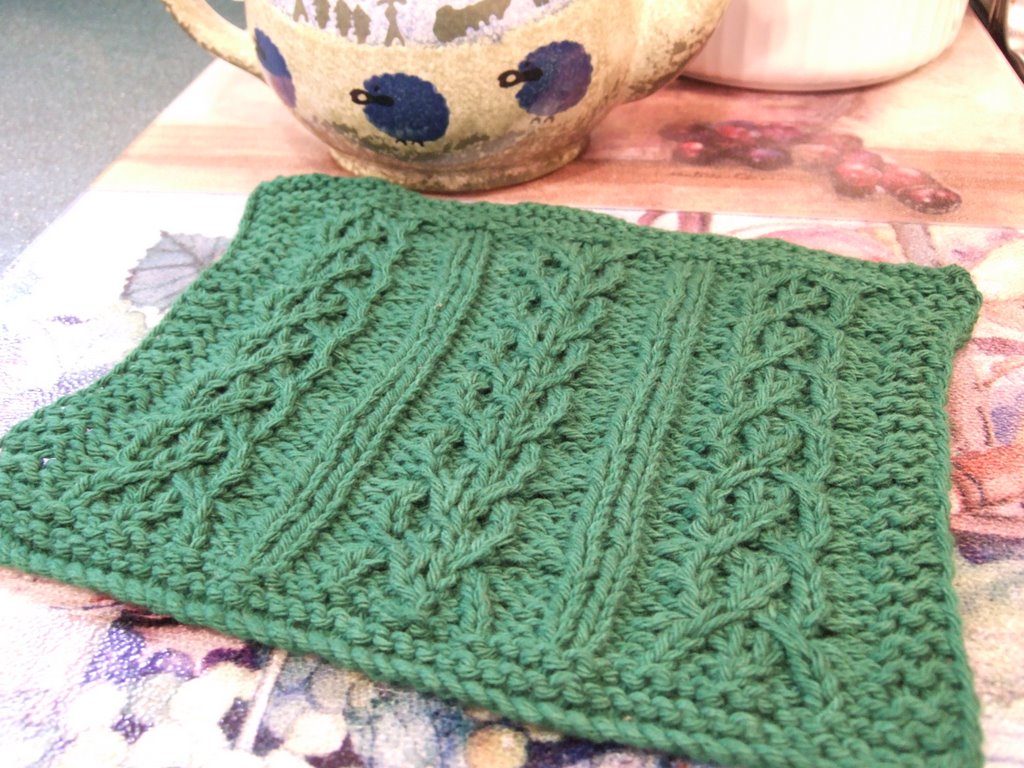
Here's my Twisted Rope Scarf, a CatBookMom original design, knit with 4 balls of Elann Highland Wool. The scarf came out to almost 6 inches wide and a little over 5 ft long. The first three photos were taken in the daytime, which means you get the Miss M special of "helping" to pat down the knitting and moving it around while I'm trying to take the picture, but it does show the scarf details and color much better than the 2 nighttime shots in the last two photos below which are sans Miss M. It's more convenient for me to take photos at night, after Miss M has gone to bed, however I haven't yet figured out how to get daytime effects when taking photos at night.


This is a great mindless knitting project. I worked on it while watching TV. Most of it is just knitting the pattern as established, knit the knits, purl the purls. Easy peasy. Out of a 48 row pattern, you only have to concern yourself with cable rows on rows 3, 9, 15, 21, 27, 33, 39, and 45. So 8 cable rows out of 48 total rows is not too bad (unlike some patterns that have cabling every other row!!!). I did not make mine a seaman style scarf, I just knit from one end to the other. At first, I was worried about it not being long enough because I was working the cable pattern where the ribbing would be. I have to admit that I was a bit slow on knitting up that 4th ball. I really did not want this scarf to end. Then I would have to find a new TV knitting project, and finishing the scarf would give me less excuses not to get back to my mom's vest which I have been avoiding for quite some time.


After working the first repeat of the pattern, I started to notice a similarity to the Utopia Hat. I remember Barbara mentioning that she took the Twisted Rope pattern and added an extra cable in the center for more width. I didn't recognize the stitch pattern similarities until now. Her Twisted Rope Panel came out of Harmony Guide 3 (which I don't have), and my Utopia Hat is based on "Pattern 36.2" from Harmony Guide 5 (page 81). I have to wonder why the Harmony Guide people chose to give the same stitch pattern different names in these two volumes. Any thoughts on why they would do that? I love how Barbara designed her pattern so that the extra center cable alternates directions.

Added note for future reference: Started on Row 25. Ended on Row 48. This is to get the 3-cable section at both ends of the scarf (instead of the 2-cable section).


Yarn info:
Fibre Content: 100% Highland Wool
Made In: Peru
Care: Hand Wash/ Dry Flat
Gauge: 19 st/4 inches 4.0 - 4.5 mm (US 6-7)
Yardage: 100 m (109 yards)
Size: 50g (1.75 oz) ball
Price: $2.38 USD

--<>--

I stumbled upon a cool little deal on the Elmore-Pisgah site, they're the people who make Peaches & Creme kitchen cotton yarn. They're offering pre-packs of yarn for the Monthly Dishcloth KAL Yahoo group. I've been so busy lately that I haven't been able to keep up with the MDKAL group (or any other Yahoo group I belong to) as I did in the past. I haven't done much dishcloth knitting lately. And I still have several BIG boxes full of kitchen cotton yarn that are feeling neglected. I would jump at this new pre-pack deal in a heartbeat if I were knitting more dishcloths and didn't already have 100+ balls of the stuff in my stash. The balls in these pre-packs work out to be about $1.12 each. Pretty cool, huh?

--<>--

I guess I'm out of the loop when it comes to anything trendy, but I have recently discovered the Hemlock Ring Blanket which is gorgeous, gorgeous, gorgeous! Brooklyn Tweed has a version that is based on this doily. I'm thinking of doing this in Elann Highland Wool or Elann Lara. Although I do wonder whether I would get the same results by following the original pattern instead of Jared's chart, because I am not good with reading charts at all. :-(

Gosh, I seem to always mention Elann yarns, you must think I'm advertising for them. LOL. I love their yarns. And I get 99% of my yarn from them. It's very convenient when you have an infant/toddler around who isn't as interested in going yarn shopping. Online shopping is the way to go.

--<>--


Let's see... I've got 4 balls of Austermann Mayfair (60% viscose rayon microfibre / 40% acrylic worsted weight -- 20/4 - US6 (4mm) - US8 (5mm) -- 131 yds / 120 m per 50 gm ball) that I don't know what to do with. I'm not sure I have enough for a scarf. And if it becomes a scarf, it would probably have to be a lacy design since I don't have a lot of this yarn. I'm not even sure this would make good scarf yarn. I picked up this yarn aeons ago without any real project in mind. In retrospect I think I should have passed on this. I'll have to find some time to play around with it. Perhaps the yarn will surprise me.

Sorry, another bad photo due to nighttime lighting. The easiest time for me to take photos is at night, after Miss M has gone to bed. Unfortunately I can't take advantage of natural daylight which makes photos come out better.

--<>--

I think this Caterpillar Toy is so cute! I'm thinking it's a small enough project that even *I* can finish before the next Ice Age. And it would be a great way to use up little scraps of yarn. A squeaker and bell are mentioned under Optional Element 2, and I have to wonder where you would go to get something like that for this toy. It would have to be something that is also washable. Of course, I'm thinking baby toy, thus it MUST be washable. I really hate when baby toys are labeled "surface wash". What are they thinking when they design these things? Don't they know that babies are gonna put things in their mouths, drag stuff across whoknowswhat, etc?!?!

Check out the rest of her designs. They are way cool. I love the little people. I'd love to make The Wiggles (Miss M loves them) but I'm afraid knitting something that small will drive me batty.

--<>--

And if you're looking for a way cool cable scarf, take a look at the Secret Admirer Scarf. I like this binary pattern way more than the Binary Hat and this other Binary Scarf. The scarf on Knitty looks cool, but OMG, it would take me forever to knit with 2 colors. The hat has its limitations in how long your message can be because you can only go down so far in yarn thickness to squeeze everything in before the hat becomes too long. The example in the pattern to spell "hat" is in lowercase. You can refer to this chart if you want to spell "hat" in uppercase or you can refer to it if you want to compose a different message. The only thing I would omit in the hat pattern is the "checksum". I think I like the Secret Admirer Scarf more because I like cables (had you noticed?). And I do like how she represented the letters as 5 bits instead of 8 bits. Makes it possible to do the scarf in worsted weight yarn. With 8 bits, you'd have to cast on 60 stitches which would make a very wide scarf in worsted weight yarn or you would have to bring it down to fingerling weight yarn to compensate on the width.

--<>--

Well lots has been going on in my corner of the world, or not a lot depending on how you look at it. Never enough time for knitting. I've been experiencing hand/wrist pain lately and knitting doesn't help it. I've also had "tired" eyes that have a hard time focusing on the needle tips.

Miss M is potty training. We've been trying on and off for the past year(!) and haven't actually made much progress until the last month or two when we went with no diapers. Just panties during the daytime, and pull-up diapers during nap & nighttime. She clearly gets the concept. We're still refining her ability to let us know before she needs to go potty. Gosh, I can't wait til she's completely out of diapers!!! I am a bit concerned about what we will do in public restrooms where the toilets are so big that she would clearly fall through. Using pull-ups when we go out would be counter productive to the potty training effort.

DH has been sick for over a week. I was busy taking care of him and trying to keep Miss M quiet and out of his hair so he could get some rest. It took him a week (including 3.5 sick days from work) before he decided to see a doctor ... never mind that I had been urging him to do so early on. Of course you can't make a same day appt with a doctor. (We also recently moved to a new city, so we have to pick new doctors) Fortunately the Camino Medical Group has an Urgent Care Facility at 701 E El Camino Real (Mountain View) where you can see a doctor on a first come first served basis. He's so funny. He was about to walk out the door without any waiting room material in hand. I suggested he take a book and/or laptop with him. Fortunately he did follow my advice cuz he ended up waiting 1 hr 45 min before getting to see someone to check his vitals, another 10-15 minutes of waiting before seeing a doctor for another 10 minutes. Silly DH though he'd be in and out quickly. Haha. BTW, would you believe they have free wireless internet in the waiting area? Cool, huh? He has the flu and a sinus infection. I hope it was the sinus infection that was causing the sharp pains on the back of his head, and not something else. He got some antibiotics for the sinus infection. Taking phenylephrine(sp? it's the stuff they use in Sudafed, Robitusin CF, etc) for his nasal congestion symptoms during the week had caused his blood pressure to skyrocket. I didn't know that this drug could do that. He was advised to stop taking that drug, and to take Benadryl or Claritin instead for his congestion. He had picked up his prescription antibiotics on the way home, but didn't think to pick up Benadryl or Claritin, so I went to get that for him in the evening. Did you know that Claritin only comes in a "non-drowsy" formula? I went with the Benadryl, nice drowsy formula that will knock him out and let him get some sleep at night.

I've found my new reading love. I first got into mysteries by reading Elizabeth George novels. Then I branched out and tried Laurie R. King, Minette Walters, Martha Grimes, Val McDermid, and Ruth Rendell. Love them all. I just finished The Distant Echo by Val McDermid which I enjoyed very much. I'm trying to read other novels by these authors, but I am also looking forward to trying other mystery authors as well.

--<>--

Let's see, what else... oh, I may need to re-image my laptop hard drive after doing the really sloppy thing of clicking on a link that was in someone's blog comments. I should have looked where it was going. It didn't look suspicious, it was a link to someplace.blogspot.com. You'd think it was a link to someone's blog. However the blog comment was unusual and should have raised red flags ... it only said "see here" where the word "here" was the link to the blogspot URL. Plus the commenter's name wasn't one of the usual suspects you run into who leave comments on knitting blogs. Upon clicking on the link, pop-up windows appeared, some message about anti-virus, one window showing a status bar for something being installed(!). It was not a feel good moment. It's like those times when you push the car door shut and realize in that split second that the car keys are inside and there's nothing you can do to stop the motion of events. Ok, not a good analogy since most cars these days are idiot proof and won't let you lock the car with the keys inside, but you know what I mean. I don't know what malicious things were done to my computer from clicking on the link. The only thing I notice so far is that my Norton Anti-Virus no longer works. Anyhow, there's an unclean feeling on my laptop and I'd feel so much better after it is wiped clean and we start on a clean slate.

Fun fun fun... this is going to be a multi-day project. On the upside, thank goodness I have USB 2 to backup data onto an external hard drive. :-)

.

Sunday, February 17, 2008

Thoughts on Increases

Thoughts on Increases ... or Smariek Knits' Blooper Archives ...


.

Remember this mitt?

Through trials and errors (more errors than trials) I had actually knitted several of these mitts (both Persephone & Regina), more than you have seen in previous posts, and in the process had played around with different methods for doing the increases in the thumb gusset section. I just wanted to share my thoughts and findings here. Oh another discovery I've made and did not mention before is that I can get 3 Persephone mitts (1.5 pairs) out of 2 balls of Baby Cashmere, and thus 6 mitts (3 pairs) out of 4 balls. So if you're not sick of the pattern (I know I am, lol) and you have 450 yds of fingerling weight yarn, you can knock off 3 small pairs of mitts for gifting. :-) I can't make the same claim about the Regina Mitt because that one uses a little bit more yarn (due to all those bobbles).
.


In the first two increase rounds of the thumb gusset section, I made two consecutive increases back to back. The photo above shows the results from doing M1F, M1F. As you can see, it can leave a small hole where the increase is done. Or perhaps I'm just not very good at doing M1F twice in a row.

Video for M1F can be seen here.
.


This mitt shows a much more tidy increase at the base of that gusset. This one was done by doing M1F, KRL. This seems to be a perfectly acceptable pairing of increases at the base of the thumb gusset.

Videos for M1F and KRL can be seen here.
.


I decided to go down the KLL, KRL path because the KnittingHelp site said, "This pair of increases is ideal if you ever need to do two increases side by side without any stitches between them." Sounded like a good thing to try. This mitt shows what you get if you do KLL followed by KRL. I did KLL, KRL on Thumb Gusset rounds 1 and 3. And for all subsequent increase rounds, I did KLL on the right side and KRL on the left side. I like the look of the KRL, but not so much the KLL running up the right side.

Videos for KLL ond KRL can be seen here.
.


These mitts use KLL, KRL for the double increases on two of the thumb gusset rounds (viz. the back-to-back increases in Thumb Gusset rounds 1 & 3). Then I used KRL for both increases on subsequent increase rounds. I think this looks the best out of the bunch. What do you think?

The bottom photo is the one I knit in Elann Baby Cashmere, Peacock color, where I revised the thumb gusset area to work a wrap-around thumb for more coverage.

Videos for KLL and KRL can be seen here.


Then I wondered why I didn't use the most obvious choice increases for the right and left sides (after doing KLL, KRL for the back-to-back double increases on Thumb Gusset rounds 1 & 3). It goes to show that what is obvious to the rest of the world is not necessarily obvious to me. For increases starting from round 5, I used M1F along the right side and M1B along the left side. I think this was an acceptable pair of increases and probably much easier for most people to do, due to familiarity with those two. However I have to say that I still prefer the KLL, KRL pair for rounds 1 & 3, followed by KRL for all subsequent increase rounds.

Videos for M1F and M1B can be seen here.

My Conclusion:

My first choice is to do KLL KRL at the base of the thumb gusset. Then work KRL for increases up both sides of the thumb gusset.

My second choice is to do KLL KRL at the base of the thumb gusset. Then work M1F for increases up the right side of the thumb gusset, and work M1B for increases up the left side of the thumb gusset.

Well there you have it. Please don't interpret this as the "right" way to do things because I have little experience with thumb gusset increases. I don't know what is considered the best or more proper method for working the thumb gusset increases, you would have to consult the mitten experts for that. I'm just sharing what I discovered in the process of knitting all these mitts.


And here's one that is not increase related. This was an early version where I knit the thumb gusset section in stockinette stitch all the way up to bind off, forgetting that stockinette had a curl factor. I didn't like how that looked, so I changed it to K1P1 ribbing in the last row, and then bound off in K1P1 pattern. That solved the curling and gave the top edge a nice finished look that sort of matched the top and bottom K2P2 ribbing of the main part of the mitt. I could have gone with K2P2 ribbing for the thumb also, but I thought that would look too "big" for the thumb section. I think the K1P1 ribbing looks more proportional.

Well there you have it. Proof that my knitting certainly does not come out perfectly on first try.


Pattern: Persephone Fingerless Mitts
Yarn: Elann Baby Cashmere, 2 balls, Morning Mist
Needles: 2.75 mm (US2)

This pair is going to my Mom. It's knit from the same Baby Cashmere I used for the Osiris Scarf I made her last year. These mitts only "go" with the scarf because they both use the same yarn and same colorway.

There is a flaw in these mitts. The cuff on the right mitt is 6 rounds while the cuff on the left mitt is 10 rounds. Nope, ya can't trust me to be able to follow my own pattern. You'd think that would not be a problem after having knit so many of these mitts, lol.

I know what Mom will say when I give these to her. She'll nag, er I mean, ask about the vest I should be knitting for her.


Pattern: Persephone Fingerless Mitts
Yarn: Elann Baby Cashmere, 2 balls, Peacock
Needles: 3.25 mm (US3)

Modifications:
1. Used 3.25 mm needles instead of 2.75 mm to create slightly larger mitt that would fit a small/medium ladies hand (cuz this will be gifted to someone with larger hands than mine).
2. Redesigned the thumb gusset and made a wrap around thumb.

When I have more time, I will update the pattern with the thumb gusset changes I made in this version of the mitt. After trying out a wrap around thumb for my Regina Mitt, I decided that having this was well worth the trade-off of having to re-attach yarn and weave in more ends.


.
Yarn info:
Fibre Content: 60% Baby Alpaca/ 30% Merino Wool/ 10% Cashmere
Made In: Peru
Care: Hand Wash/ Dry Flat
Gauge: 28 st/4 inches 3.25 mm (US 3)
Yardage: 100 m (109 yards)
Size: 25g (0.88 oz) ball
Price: $3.30 USD
.