Modified Swiffer Mop Cover
1. More Free Patterns can be seen along the sidebar (on right side),
or you can use the Free Patterns label to view all posts.
2. Free Pseudo-Patterns or Pattern Outlines can be found using the Free Pseudo-Patterns label.
Here's my second Swiffer Mop Cover...
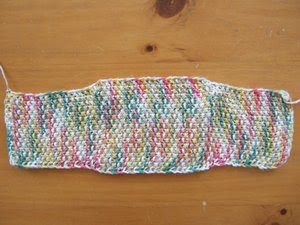
Since my very first Swiffer Mop Cover was a smidgen too narrow widthwise, I tried to tweak it so that it would fit my mop head. I liked how it fit at the ends, but wanted the main section to be wide enough to cover the mop surface. So I made it wider in the middle. This is what it looks like before I seamed the two ends:
And this is what it looks like after seaming:
It appears to fit the mop surface OK...
Here's a view from the top:
You'll find Sarah's Swiffer Mop Pattern here. It's a quick & easy knit.
If you find that her mop cover is a little too narrow for your mop, then you might try making the same modifications I made: After knitting the 2.5" of fold-up edge, increase by 4 stitches in the main section for the added width and then knit for about 10", then decrease back to 17 sts and finish off the last 2.5" of fold-up edge.
The number of rows you will knit for each section may vary from the number I knitted because everyone knits differently... but if you're curious, I knit mine as follows:
-- CO 17 sts
-- Seed stitch for 30 rows
-- Increase 4 stitches in next 2 rows
-- Seed stitch for 40 rows
-- Decrease 4 stitches in next 2 rows
-- Seed stich for 30 rows
Need more explicit info for the increase/decrease? I tried to keep the seed stitch patterning in mine, but you can do yours any way you like. It's just a floor mop, nobody really cares! LOL. I slipped the first stitch of every row because I was under the impression that the chain selvedge would help me when I seamed the fold-up edges. I don't think it matters either way.
Increase Row 1: Slip1, M1K, (P1, K1)x7, P1, M1K, K1
Increase Row 2: Slip1, K1P, (K1, P1)x8, K1, M1P, K1
Decrease Row 1: Slip1, SSK, (P1, K1)x7, P1, K2Tog, K1
Decrease Row 2: Slip1, P2Tog, (K1, P1)x6, K1, P2tog-tbl, K1
M1K = lift thread between stitches with left needle, knit through back loop
M1P = lift threadbetween stitches, purl through back loop
SSK = slip, slip, knit slipped stitches together
K2Tog = knit 2 stitches together
P2Tog = purl 2 stitches together
P2Tog-tbl = purl 2 stitches together through back loop
Note: On Aug 3, 2007, I made further modifications to this swiffer mop cover in an effort to get an even better fit. You can see my 2nd modified swiffer mop cover here.
We've been busy going to our new house on the weekends in an attempt to get "stuff" done. Unfortunately, we get little done (or much less than we had planned), due to M's constant need for attention (plus trying to work around her nap/feeding schedule).
I want to wipe down all the kitchen cabinet & linen closet shelves so I can start puting in shelf liner and moving stuff in. I've already moved a couple of boxes of stuff to the new house. I want to empty the boxes so I can take them home and refill them again.
We have these skinny little moths in the house, mostly in the kitchen and inside the cabinets. CBM thought they might be "pantry" moths. I've never heard of them before, we don't have them in our current house. Anyhows, DH tried to get rid of some of them last week when he stopped by to start some caulking of the kitchen sink, and I didn't see more of them when we went to the house on Saturday, so I take this as a good sign that these moths aren't multipyling at some exponential rate. I need to look into moth prevention...
The moths are just a minor annoyance. The major annoyance are the gazillion of wasps outside our back yarn (they don't seem to like the front yard as much). M really wants to go outside, but we don't let her cuz she is oblivious to the wasps and I don't want her walking right into them. The wasps tend to hover just above the grass. I wonder if there is something about all the fruit trees and rose bushes which attract the wasps. I don't see any obvious place the wasps are coming from, no visible nest from what we can tell.
Here's our Peach tree. The previous owner let the branches grow and grow and grow, so the peaches weigh down the branches which now touch the ground.


We have a Lemon Tree with LOTS of lemons...


And to the right of the Lemon Tree is our Orange Tree. I think that might be a bird feeder in the 2nd photo?


So far we have managed to do the following:
1. Get window treatments in the queue.
The Blinds Window Measurer came by on Friday 6/22. He only had to measure the windows where the blinds will be installed (viz. bedrooms, kitchen, & bathrooms), but he also measured the living room & dining room windows where the shutters will go. The Shutters Window Measurer (a different guy) was supposed to come by on Friday, but he was too busy and couldn't make it. We still have to reschedule that appt.
2. Get carpets in the queue.
We have chosen a light whitish colored berber carpet for the 4 bedrooms. We'll probably get a call from the Carpet Measurer early next week.
3. Purchased an electric stove and hood.
I've always had a gas stove, so I really had no idea what I was looking for in an electric stove. It will be interesting to learn how to cook on an electric stove, I'm sure some minor adjustments will be necessary. Thank goodness all my pots have flat bottoms. The stove has a convection oven. Never used one of those before, but the salesperson told me I could choose between regular thermal baking or convection baking. He told me that convection baking is great for baking several racks of cookies at the same time. We'll see...
The stove looks something like this:
I do like how the knobs are in the back where M can't reach them. And one selling point (for me) was the cooktop/oven lock. Yes, it is stainless steel. DH insisted that we get stainless steel appliances. He wants a stainless steel fridge too.
.

























1 stitch(es):
well, things are slowly falling into place it seems. a backyard with fruit trees!!! Very nice. :) The stove looks great too. :)
Post a Comment